Firing clay at home opens up possibilities for budding ceramic artists and hobbyists alike. In this article, we will explore 7 simple ways to fire pottery that will empower you to bring your creative visions to life without breaking the bank or compromising on quality. If you’re a seasoned potter this guide will spark your curiosity and inspire you to experiment with firing clay in new and exciting ways.
A Word about Safety
Safety should always be a top priority When working with high temperatures and hot ceramics. As a potter, ensuring your well-being during the firing process is essential to enjoying your craft for years to come. Beyond just wearing protective gear like heat-resistant gloves and goggles, it’s crucial to have proper ventilation in your workspace to prevent inhaling harmful fumes that can be released during firing.
Different clays and glazes can have varying chemical compositions that may pose health risks if not handled properly. Educate yourself on the potential hazards of each material and take necessary precautions such as using dust masks when handling dry clay or wearing aprons to protect your skin from glaze splatters.
How to Fire Clay at Home
When it comes to bisque firing your clay at home, it’s crucial to follow a slow and steady heating process. This helps in removing any leftover moisture from the clay without causing cracks or damage. Investing in a kiln or using a pottery oven can be essential for achieving the right temperature and ensuring even heating.
After the bisque firing stage, you have the exciting opportunity to unleash your creativity through decoration. Explore various techniques such as painting, carving, or stamping to add personal touches to your creations. Experimenting with different glazes, colors, and finishes can result in stunning and one-of-a-kind pieces that reflect your artistic vision.
7 Ways to Fire Clay at Home
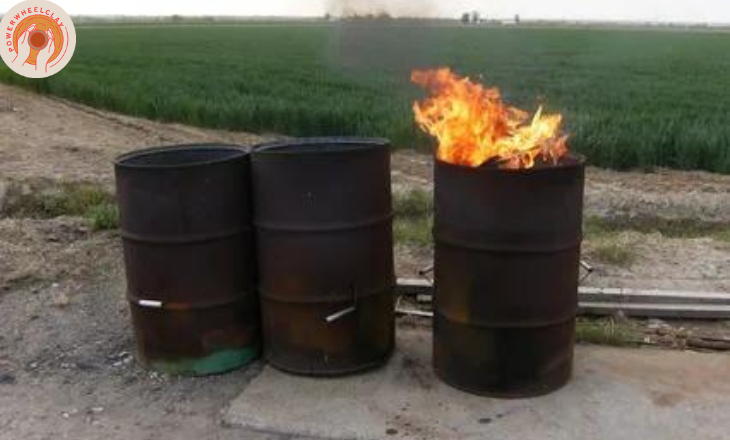
One unconventional way to fire clay at home is using a trash can kiln. By stacking alternating layers of charcoal and pots inside a metal trash can, you can achieve high temperatures for firing your clay creations. This method provides an affordable and simple solution for those looking to experiment with pottery without investing in expensive equipment.
Method 1: The Microwave Kiln
Microwave kilns offer an intriguing and unconventional approach to pottery firing, catering primarily to small-scale artists or hobbyists seeking a more accessible means of creation. The use of susceptor materials within the kiln transforms the microwave’s electromagnetic energy into heat, providing a unique and rapid firing process not commonly associated with traditional methods.
One of the key advantages of microwave kilns lies in their compact size and portability, making them ideal for artists with limited space or those looking for a more versatile firing solution. The ability to quickly fire small pieces of clay or fuse glass allows artists to test out new ideas without committing to larger projects or investing in expensive equipment.
Microwave Kiln Firing Temperatures
When using a microwave kiln for firing pottery, it’s essential to consider the unique advantages it offers. The lower firing temperatures not only save energy but also reduce the risk of damaging delicate pieces during the firing process. This makes microwave kilns ideal for artists seeking quick and efficient ways to fire smaller ceramic projects with precision and care.
The controlled heating process in a microwave kiln allows for experimentation with different clays and glazes that may not withstand high temperatures typical in traditional kilns. Artists can explore new techniques and designs, pushing the boundaries of their creativity in a convenient and accessible manner.
How Long Does Firing in a Microwave Kiln Take?
Firing pottery in a microwave kiln is a quick and efficient process, with most firings taking only a few minutes. The size of your microwave and its wattage play significant roles in determining the firing time, as more powerful microwaves will require less time to complete the firing process. While microwave kilns come in small, medium, and large sizes, even the largest model must fit into a standard domestic-sized microwave. This means that pieces fired in a microwave kiln need to be relatively small, restricting the amount of work that can be fired at once.
Glazing in a Microwave Kiln
Glazing pottery in a microwave kiln opens up a world of possibilities for potters looking to experiment with different firing techniques. While low-fire glazes are commonly used due to the lower temperatures required, some adventurous artists have successfully fired mid-fire glazes in their microwave kilns.
Microwave kilns offer quick and convenient firing options for artists who want to test unconventional methods in their pottery practice. The ability to achieve varied results with different glazes in a microwave kiln highlights the adaptability and creativity that can be fostered through experimentation.
Safety When You Fire Clay at Home
Safety when firing clay at home in a microwave kiln is crucial to prevent accidents and injuries. Apart from the obvious protective gear like heat-resistant gloves and goggles, it’s important to remember not to rush the process and always follow the manufacturer’s safety recommendations. Handling red-hot clay requires caution and precision, so using tongs to move or manipulate the pottery is essential.
One interesting aspect of firing clay at home is the reliance on visual cues rather than precise temperature readings. The orange glow indicating that the kiln is reaching its target temperature adds an element of anticipation and hands-on engagement with the firing process.
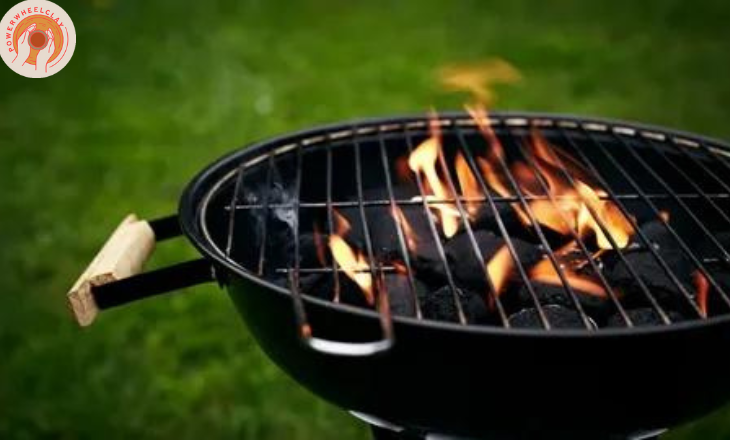
Method 2: A Charcoal Grill
Firing clay in a charcoal grill can be a surprisingly effective method for pottery enthusiasts looking to experiment at home. The gradual heating process allows the clay to reach high temperatures without the risk of thermal shock, ensuring that your creations emerge from the firing process intact and beautiful. This DIY approach also adds an element of hands-on creativity to the pottery-making experience, giving you greater control over the entire firing process.
Firing Your Pots
Firing pottery on a charcoal grill is both an art and a science. It requires a delicate balance of heat and timing to achieve the best results. By gradually heating the pots along with the coals, you are ensuring that the clay undergoes a gradual temperature increase, reducing the risk of cracks or other damage.
Placing the pots directly over the coals or around them as they heat up allows for more control over the firing process. This method not only prevents sudden temperature changes but also ensures that the pots receive even heat distribution, resulting in a more uniform firing. As the coals reach their peak temperature and start to glow red, it’s time to transfer the pots onto the grill for their final firing stage.
Charcoal Grill Firing Temperature
Boosting the firing temperature of a charcoal grill is not just about reaching scorching heat levels; it’s also an art of enhancing the cooking experience. By utilizing various methods such as blowing air onto the coals or adding wood, you can elevate your grilling game to a whole new level. This process not only accelerates the heating process but also infuses a smoky flavor into your food that cannot be replicated by any other cooking method.
Mastering the firing temperature of a charcoal grill is more than just about creating delicious meals – it’s about embracing the craftsmanship and versatility that comes with this traditional yet dynamic form of cooking.
How Long to Fire Your Pots
The duration of firing can vary based on factors such as the type of clay used, the thickness of the pots, and desired results. Experimentation and experience play a key role in mastering this delicate process.
When deciding how long to fire your pots, it is essential to consider your specific goals for the finished piece. Whether you are aiming for a raw, rustic look or a smooth glazed finish will influence your firing duration. Additionally, monitoring temperature fluctuations during firing becomes vital to ensure even heating throughout all stages of the process.
Method 3: Pit Firing
Pit firing is a truly elemental process that connects the potter to the raw forces of nature. The unpredictability of the pit firing method adds an element of surprise and excitement to the final results. Each piece is unique, bearing the marks and imprints left by the flames and smoke during the firing process.
The ancient origins of pit firing add a sense of tradition and ritual to this firing technique. It’s fascinating to think about how generations before us utilized similar methods to create pottery thousands of years ago. Pit firing allows for a deeper connection with the earth, fire, and basic elements that have shaped human creativity for millennia.
Bisque Firing in a Pit
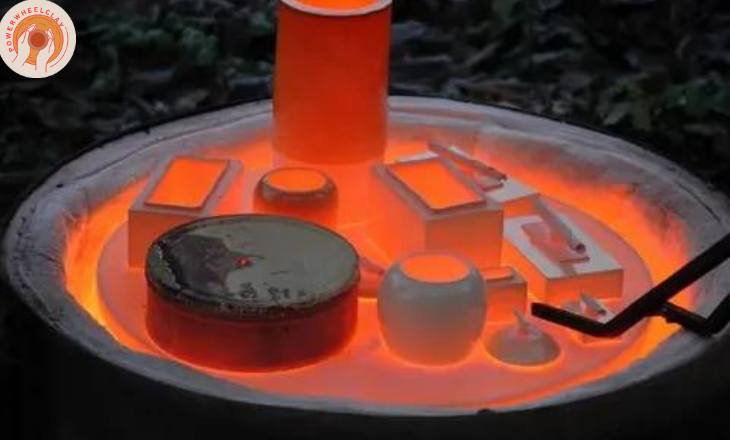
As you carefully place your pottery into the glowing embers of the pit, anticipation fills the air. Each piece holds a potential beauty that only emerges after withstanding the fiery trial of bisque firing. The crackling flames dance around them, transforming humble clay into sturdy ceramic artistry.
While some may see the inevitable losses as a setback, they are merely part of the journey toward mastery. The process teaches resilience and adaptability, urging artisans to hone their skills and perfect their craft. It’s not just about creating pottery; it’s about embracing the unpredictable nature of fire and earth to birth something truly unique.
Digging the Pit
The act of digging a pit may seem like a simple and mundane task, but it holds the key to creating a successful fire pit experience. The size of the pit is crucial in determining the effectiveness of your fire, as it needs to strike a balance between protection from the wind and allowing enough airflow.
Digging a pit can be an opportunity for reflection and connection with nature. As you dig into the earth, you are engaging in a primal act that connects you to our ancestors who relied on fire for survival. The physical exertion required to dig a pit can also be seen as a form of mindfulness practice, allowing you to focus on the present moment and connect with the elements around you.
Building and Firing a Sawdust Kiln
As the flames dance around the pottery in the sawdust kiln, a symbiotic relationship forms between the heat and the clay. The intense fire breathes life into the once-pliable clay, transforming it into a hardened masterpiece. With each piece of wood added to keep the fire alive, a story is woven into the very fibers of these creations.
When the embers glow like scattered stars in the night sky, it’s time to bid farewell to the fiery embrace. The ritualistic act of covering them with dirt or metal is like tucking in nature’s secret alchemy for its final slumber. In this transient moment between creation and completion lies a quiet reverence for ancient crafts that transcend time itself, reminding us of our connection to both earth and fire.
Method 4: Making a Simple Sawdust Kiln out of Bricks
Building a simple sawdust kiln out of bricks not only offers an easier alternative to complex structures but also allows for the efficient and effective firing of ceramics. The simplicity of this design highlights the versatility of brick materials in creating functional and practical kilns without the need for intricate construction techniques.
The use of bricks in constructing a sawdust kiln offers a cost-effective solution that doesn’t compromise on effectiveness. With minimal resources, individuals can easily build their kiln using bricks, showcasing the accessibility and adaptability of this method. This approach underscores how innovation and practicality can combine to achieve successful results, proving that even with basic materials, one can create a reliable tool for ceramic production.
Making your Brick Kiln
When building your brick kiln, it’s essential to consider the materials you use for the base. A concrete or brick base not only protects the ground from scorching but also provides stability and durability to your kiln. The size of your brick kiln should be proportional to the size of your pottery. Larger pots require a bigger kiln to ensure even heating and proper firing. By customizing the dimensions of your kiln based on your specific pottery needs, you can optimize its performance and achieve consistent results with each firing cycle.
Using Shelves?
Building shelves in a kiln not only provides a practical solution for arranging pottery but also adds a layer of protection to prevent breakage. By incorporating galvanized mesh or chicken wire as shelves, you can create an organized space for your creations while ensuring they are shielded from the impact of falling sawdust during the firing process. This innovative approach allows for efficient utilization of space and resources in the kiln, promoting a smoother workflow and enhancing overall productivity.
How to Fire Clay at Home in a Brick Kiln
Firing clay at home in a brick kiln can be both an exciting and challenging task. To ensure a successful firing process, it is crucial to pay attention to the initial stages of lighting the kiln. Adding lighter fuel on top and lighting the sawdust carefully will help establish a strong fire.
Creating vents by removing bricks or using alternative methods to allow airflow can make a significant difference in how efficiently your clay pieces are fired. As the fire intensifies and establishes itself, adjusting the ventilation by removing corner bricks allows for controlled heat distribution within the kiln.
Method 5: A Barrel Kiln
The versatility of a barrel kiln offers pottery artists the chance to explore new possibilities in their firing techniques. With its ability to reach higher temperatures than pit firing, the barrel kiln provides a controlled environment for firing pottery pieces. The lid on the barrel helps contain the heat and ensures a more even distribution, resulting in consistent results.
The portability of a barrel kiln makes it an attractive option for artists who need to move their equipment around or store it easily. Compared to traditional brick kilns that require dismantling and rebuilding, the barrel kiln offers convenience and flexibility.
Decorating Clay for Firing in a Barrel Kiln
The process of decorating clay for firing in a barrel kiln opens up a world of creative possibilities for potters. By using materials like copper scouring pads, Miracle-Gro, and coffee grounds wrapped in aluminum foil, artists can achieve unique and unpredictable effects on their bisque ware. The concept of creating saggar jackets to hold these materials against the pottery during firing adds an element of mystery and excitement to the artistic process.
Experimenting with oxides, salts, and organic materials such as straw, banana skin, and salt-infused seaweed not only adds texture and depth to the finished pieces but also lends a sense of nature’s touch to the art.
Types of Barrel Kiln
One lesser-known type of barrel kiln is the retort kiln, designed for efficient charcoal production. This kiln consists of a closed container where wood is heated in a low-oxygen environment, leading to the creation of high-quality charcoal. The advantage of a retort kiln is the ability to control the airflow and temperature precisely, resulting in consistent and clean charcoal production.
Pit kilns are among the simplest types of barrel kilns used for pottery firing. These traditional structures involve digging a pit in the ground, lining it with bricks or stones, and placing pottery inside before covering it with fuel and igniting it. Pit kilns can reach high temperatures but lack consistent heat distribution compared to more advanced designs like tunnel or downdraft barrel kilns.
A Simple Barrel Kiln
One key advantage of a simple barrel kiln is its portability and ease of assembly. Unlike larger, more complex kilns, a barrel kiln can be easily moved and set up in different locations, making it ideal for smaller-scale operations or for those who may need to move their kiln frequently.
The simplicity of the design makes it accessible to individuals with limited resources or technical knowledge. With just a few basic materials and some know-how, anyone can construct and operate a barrel kiln. This democratization of kiln technology empowers more people to engage in pottery-making or other crafts that require firing processes, opening up new opportunities for creativity and self-expression.
A Downdraft Barrel Kiln
The design of a downdraft barrel kiln offers a unique way to control airflow and oxygen levels during the firing process. By drawing air in from the top and forcing it down through the chamber, a more consistent heat distribution can be achieved which can lead to better firing results.
One advantage of a downdraft barrel kiln is its ability to reduce energy consumption compared to other traditional kilns. The focused downward airflow helps create a cleaner burn, reducing waste and minimizing fuel usage.
An Updraft Barrel Kiln
The design of an updraft barrel kiln offers a unique approach to firing ceramics that can yield remarkable results. By having the chimney on the lid and vents on the side of the barrel, this kiln allows for precise control over airflow during the firing process. One interesting feature is the ability to close off the side vents once the embers are heating the chamber, optimizing heat retention and uniformity in temperature distribution.
This method of firing not only ensures efficient combustion but also promotes a more controlled environment for achieving consistent results in pottery making. The strategic placement of vents and chimneys enables potters to fine-tune their firing process, resulting in beautifully finished pieces with intricate details preserved by controlled heat management.
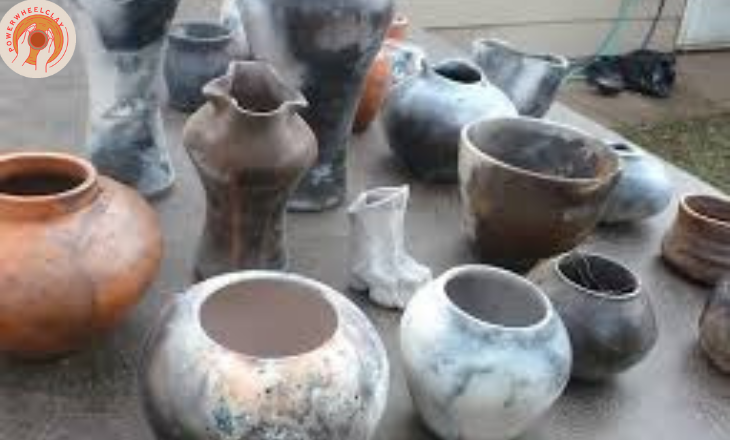
Finishing your Barrel-Fired Pottery
Carefully remove your pottery from the barrel kiln, each piece reveals a unique combination of colors and smoky patterns that can only be achieved through the barrel firing process. The sooty residue serves as a reminder of the intense heat and organic flames that brought life to these clay vessels. It is in this moment of transformation, from raw clay to finished artwork, that the true essence of barrel-fired pottery is revealed.
The act of cleaning each pot becomes a meditative ritual, as you gently scrub away the remnants of the fiery ordeal. The process unveils nuances in texture and tone, creating a tactile connection between the artist and the creation.
Method 6: A Raku Kiln
One of the mesmerizing aspects of firing clay at home using a raku firing process is the element of unpredictability in the outcome. The fire and smoke interact with the glazes in unique ways, creating stunning patterns and colors that are impossible to replicate through traditional firing methods. Each piece becomes a one-of-a-kind work of art, infused with the energy of the flames and the earth itself.
The process is a beautiful reminder of our roots as creative beings, harnessing nature’s elements to bring beauty into the world. Embracing this ancient technique in modern times can be a meditative experience, grounding us in the present moment while honoring centuries-old traditions.
How Does a Trash Can Raku Kiln Work?
The process of firing ceramics in a DIY trash can raku kiln is a fascinating blend of science and art. As the propane flame enters through the burner port, it ignites a dance of transformation within the kiln chamber. The intense heat interacts with the chemical composition of the glazes, creating unique color variations and lustrous finishes on the pottery pieces.
One cannot help but marvel at how such simple materials – a discarded trash can, propane gas, and basic tools – can come together to produce stunning works of art through this ancient Japanese firing technique. The element of unpredictability adds an element of spontaneity and surprise to each firing session. Each piece that emerges from the Raku kiln bears witness to this alchemical process, making it not just a vessel for holding things, but rather an embodiment of creativity and innovation.
Using a Trash Can Raku Kiln
The unique process of using a trash can raku kiln adds an element of spontaneity and excitement to the pottery-making experience. The rapid heating and cooling in a raku firing allows for unexpected results and beautiful variations in glaze effects, making each piece truly one-of-a-kind.
As the kiln reaches its target temperature in just 25 minutes, there is a sense of anticipation and urgency in the air. Watching the transformation of raw clay into a finished piece right before your eyes is a thrilling experience that connects you intimately with the creative process.
Bisque Firing in a Raku Kiln
When bisque firing in a raku kiln, the key is to control the ramping up of temperature. The slow and gradual increase prevents any sudden shocks to the greenware that could lead to cracking or exploding. This delicate process requires patience and careful monitoring to ensure a successful outcome.
Unlike traditional bisque firing methods, using a raku kiln adds an element of unpredictability and excitement to the process. The unique characteristics of raku firing, such as its rapid heating and cooling cycles, can create stunning effects on clay surfaces. Embracing this element of surprise can result in unexpected but beautiful artistic creations.
Method 7: A Small Plug-in Hobby Kiln
When it comes to firing clay at home, a small plug-in hobby kiln offers convenience and versatility. These compact kilns are perfect for artists working on smaller projects like jewelry, figurines, or mugs. They eliminate the need for relying on a communal kiln or studio space, allowing you to experiment and create in the comfort of your own home.
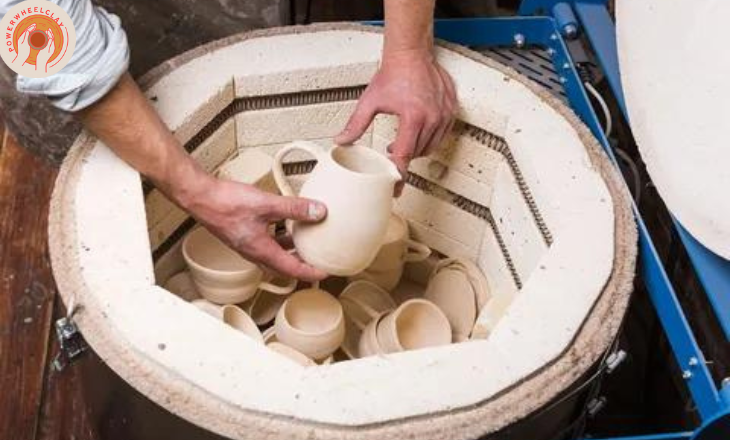
One important factor to consider when using a hobby kiln is space and ventilation. It’s crucial to have an area that can accommodate the size of the kiln while also ensuring proper ventilation to safely release fumes and heat during firing. Additionally, be mindful of your power supply as some kilns may require higher voltage than standard domestic outlets.
Buying a New or Used Electric Kiln?
When deciding between buying a new or used electric kiln, cost is often the primary consideration. While a brand-new kiln may come with warranties and the assurance of pristine condition, a used kiln can offer significant cost savings. It’s important to carefully assess the condition of a second-hand kiln before making a purchase, as issues such as worn-out heating elements or faulty controllers can be expensive to repair.
One advantage of purchasing a new electric kiln is access to the latest technology and features. New models often come equipped with advanced programmable controls, energy-efficient designs, and improved safety features.
Opting for a New Electric Kiln?
When opting for a new electric kiln, consider the long-term benefits it can provide. Not only do you get the peace of mind of after-sale support from the manufacturer, but you also benefit from greater efficiency. New kilns are designed with the latest technology to ensure optimal energy usage, ultimately saving you time and money in the firing process. Skutt’s range of smaller kilns, like the KMT 614, are tailored for home use and offer precision firing capabilities that can elevate your pottery projects to new heights.
Investing in a new electric kiln is an investment in your craft and creativity. The consistent performance and reliability of a new kiln can enhance your pottery-making experience by providing more control over firing processes and results.
Can you Fire Clay at Home in an Oven – is it Possible?
While it may be possible to dry clay in a domestic oven, achieving the high temperatures required to transform clay into ceramic material is not feasible. The chemical water bound within the clay particles needs to be driven out for this transformation to occur.
Attempting to fire clay at home in an oven could result in underfired and weak ceramic pieces that are more likely to crack or break during use. To ensure successful firing and proper transformation of clay into ceramic material, it is crucial to utilize a kiln specifically designed for this purpose.
The Domestic Oven
While a domestic oven may not have the necessary heat capacity to fire clay, it can still be a valuable tool in the clay-making process. By using your oven to thoroughly dry out your clay creations before firing them in a kiln or alternative method, you are ensuring that they are adequately prepared for the next stage. This step is crucial in preventing cracking or uneven drying that can occur if the clay is not properly dried beforehand.
Conclusion
One important aspect to consider when firing clay at home is the type of kiln you will use. There are electric kilns, gas-fired kilns, and even homemade DIY kilns that can all produce different results. Electric kilns are often preferred for beginners due to their ease of use and consistent temperature control. However, gas-fired kilns can offer a more hands-on approach and unique firing effects that many artists appreciate.
FAQ’s
What is the Temperature for firing clay in an oven?
You can fire clay in a regular home oven, but it is recommended to use an oven dedicated to crafting purposes. The temperature for firing clay in an oven typically ranges from 500-1300°F, depending on the type of clay and desired results.
How to Fire Pottery without a Kiln?
Pottery can be fired without a kiln using alternative methods such as pit firing or sawdust firing. The time it takes to fire pottery without a kiln varies depending on the method used, but it can range from several hours to a full day.